
How does Digital Right to Work software work? TrustID’s Process explained
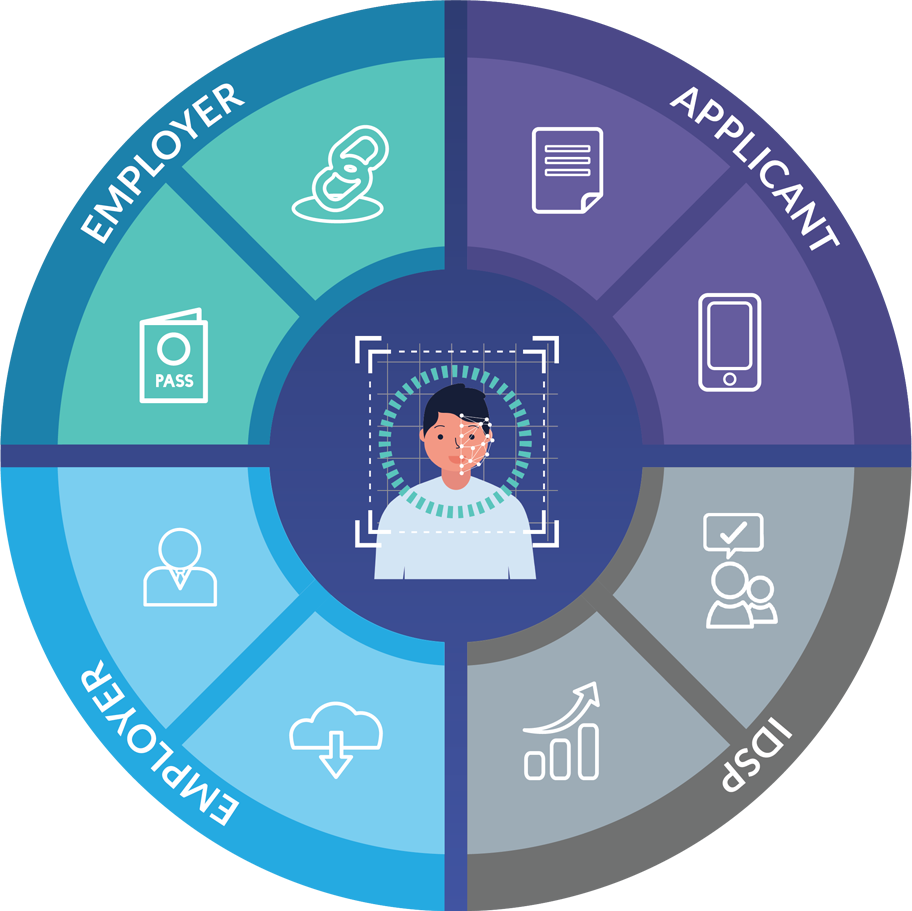
Conducting Digital Right to Work checks doesn’t need to be a time-consuming or complex process. Identity Service Providers (or IDSPs) like TrustID offer technology which can streamline and simplify these checks. As a certified IDSP, TrustID provides a user-friendly digital Right to Work service that helps employers onboard applicants quickly and efficiently. In this blog, we will talk you through the simple steps of TrustID’s Digital Right to Work process.
Step 1: Confirm Eligibility and Log In
As an employer, the first step is to confirm that your applicant holds an eligible document. Remember, eligible documents are in-date, biometric British and Irish passports and Irish passport cards. Once this is confirmed, you just log into your account dashboard through the TrustID portal. The service is easily accessible through a browser on any laptop, mobile, or tablet device. Our cloud-based service means there’s no software to install and give you a flexible and convenient way to access our Right to Work platform.
Step 2: Issue a ‘Guestlink’
From your account dashboard, you can issue a one-time email access link to your applicant. This email invitation, which is known by TrustID as a Guestlink, gives your candidate a secure way to capture and upload a photograph of their document. You can customise the Guestlink email text to help your candidates best prepare and ensure that they have the right document to hand.
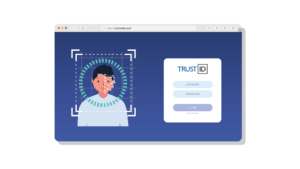
Step 3: Applicant’s Process
The applicant receives the Guestlink email and when they’re ready to upload their checks, they open it on their mobile phone or tablet device and follow the straightforward steps. Our simple process doesn’t need your candidate to download an App.
During the process, the applicant is prompted to capture a photograph of their passport or passport card. The system has an intuitive ‘step by step’ process to help make the capture process as smooth and efficient as possible. And we provide guidance on capturing high-quality images to help.

Step 4: Face Match and Validation
Finally, the applicant needs to submit a selfie image for a biometric face match and liveness check. This selfie image is for our software to compare to the photograph on the identity document.
That’s all your applicant needs to do.
Step 5: IDSP processes the check
The TrustID Identity Validation Technology (IDVT) assesses the submitted identity document, reviewing key security features and our service checks the selfie image.
The validation process is typically completed within minutes. However, if the image quality is poor or the document fails any automated software checks, TrustID’s UK-based expert document analyst team will review it. This human expert check may extend the processing time slightly but our target response time is 1 hour, 365-days a year.
Step 6: Completing the check
Once the check has been processed, the TrustID service will send you an email to let you know. And you will see a detailed report in your Right to Work dashboard.
Step 7: Maintaining Records
To maintain records and facilitate future audits, you need to download a copy of the digital Right to Work report.
Step 8: Final Confirmation
As a final step, you will need to confirm that the employee who comes to work for you matches the identity of the person verified by TrustID. You can make this final check either face to face or over a video call but it’s an essential step to support your Statutory Excuse.

In just a few steps, the TrustID digital Right to Work service offers a quick and easy way to onboard your applicants from anywhere! If you need any more information or have any questions, please get in touch.
Have more questions? Get in touch to watch the full video here.
Interested in learning more about using an IDSP for Right to Work checks? Read our FAQ blog here.
If you liked that, you might like this..

Faster Right to Work checks to secure the best talent
Tony Machin
March 19, 2023
Most employers clearly understand the importance of securing candidates who have the Right to Work in the UK. However, in our recent survey, only 60% of organisations say they use technology to help secure the best talent ahead of the competition.

4 questions to ask before choosing Digital Right to Work Checks and an DVS Provider
Tony Machin
April 19, 2024
Following an update to Right to Work guidance in April 2022, the Home Office launched a new digital Scheme – a permanent option for remote recruitment of applicable candidates. As a leading DVS provider, we speak to hundreds of companies, helping them to explore their options for Right to Work checks.
Sign up to receive updates
Receive notifications from TrustID direct to your inbox. Simply fill out your email address in the form below.
Want to find out more?
We’d be really happy to chat through your requirements and offer advice on the best service for your business.
Tel: 0118 466 0822 or email us.
Request a callback